(FYI: This is Paul writing. I don't do it often on here.)
I've always been a passive fan of This Old House. I remember watching episodes way back when Bob Vila was host, and catching bits and pieces when Steve Thomas took over. Kevin O'Connor now does the main hosting, and he's pretty active on Twitter. As we really began working on 612 in earnest, I turned to the show and watched every episode of the 2012 Cambridge house. I watched a few episodes more than once. While not everything they do on the show applies to Oklahoma or our current project, I appreciated all the help I could get. I started to DVR every episode of Ask This Old House as well. Usually got a good piece of info out of every episode. The general website contains a ton of helpful videos and articles that have guided me along the way as well. I will admit that when Christ and I subscribed to This Old House the magazine for a couple years, we never felt like we learned all that much. Maybe we weren't paying enough attention... not sure.
To me, the interest in This Old House is twofold: First, they do an
incredible job of educating homeowners and renovators. Second, they are
just plain funny. I love the humor displayed on the show. It makes
everyone feel so much more real and connected. Most of the TV I have
loved to watch over the past years is usually educational with a side of
humor (Good Eats being among my favorite). The combination always helps me learn.
Last week I noticed that two of the other main contractors had entered into the Twitter world: Roger Cook and Richard Trethewey. These two guys are only being followed by less than 400 people each right now. I know it's early in their Twitter life, but I recommend anyone interested in home rehab/renovation/landscape follow these guys. And, as a silly side note, when I mentioned this on Twitter last night, Kevin was kind enough to reply back. Always makes me smile when someone like that takes the time to reply.*
*If I was counting, and I'm not... or maybe I am, that's Rick Bayless, Desmond Howard and Kevin O'Connor that have directly interacted with me on Twitter. I'd likely never had a chance to talk to them before Twitter.

Wednesday, April 24, 2013
Tuesday, April 23, 2013
A Pee-ano Arrives
If you follow Paul on Twitter, Instagram or Facebook you saw that we got a piano this weekend.

This piano belonged to my dad's mother, June Hanna-Willson. That seems like such a strange thing to say. Most people would say it was their grandmother's, but this wasn't my grandmother's. My dad's mother June died in 1969 in a hospital in my hometown in Texas; my dad was only 7 years old. She died after a battle with breast cancer and while, technically, yes, she was my grandmother I never knew her. My grandfather loved her very much. She loved her boys, three sons and a husband, my dad the baby, very much. And while all of her boys loved her, I've been told they did not love their piano lessons nor their piano teacher Mrs. Johnson. June's parents, mom and pop Hanna, gave this piano to her in 1947 as a Christmas present when she was 16 years old. It was a brand new piano, and the Hanna family was not very wealthy; this was a big present. My granddad was already dating June at the time and remembers when she got the piano. This was and is a very special piano. My grandfather remarried years after she died, to a lady I knew my whole life as my grandmother, Ruth, and I loved her very much. She and my grandfather kept this piano as their family morphed and changed and moved. This real life Brady Bunch family grew up playing this piano, and then they all had children and we all grew up banging on the keys, chipping the edges of the ivory and putting scratches all over its surface in the formal living room of their house.
This Story and Clark piano was manufactured in 1947 in Grand Haven, Michigan. For those of you that don't know, Paul was born and raised in Holland, Michigan only 22 miles south of Grand Haven. I smile to think that my little family in Brownwood, Texas purchased a piano from a city only 22 miles away from where my future husband was to be born.
My grandmother Ruth passed away in 2008 and with her passing came a lot of heartache for my grandfather. He had lost two spouses in his lifetime and it was difficult. Just a few months ago, he moved to Abilene, Texas to be near what he calls, "a special friend". He and Betty are very sweet and are going to enjoy hanging out and being friends together in their remaining years.
But with his moving, all the memories of my grandparents' house moved with him. They're tearing down the hospital in Wichita Falls where my dad was born, where his mom died, where my brother was born. My parents are moving to Dallas. Everything is changing. And I look at this piano and I see June, and my dad and his brothers. I see Ruth and her daughters becoming a part of our family. I see my granddad and his formal living room. I see my cousins and the sleepovers we had at their house. I think about my dad bringing my mom home to meet his parents for the first time. Her looking over the house, seeing the piano and all the pieces that made up their home. I walk into our bonus room where the piano sits now and smell it, I smell the house where we had family get togethers. I smell that life. And I think about Addison and the cute way she says "peee-ano" and I think about her giggles when she presses the keys and the fit she threw last night when I wouldn't quit playing it. I think about what she will remember.
And I am so thankful that my granddad allowed me to have this memory and that all the other 14 or so adult individuals in my family allowed me to as well. I am thankful my parents were willing to haul it to Oklahoma City. I want to play again and when things slow down, that's exactly what I intend to do.
Until then, the whole piece needs a good wipe down with old english, a reupholstered bench, some art and a light. I'm glad it's here. I already feel like we have a home.
Monday, April 22, 2013
All we lack is finishing up.
I wish I had more time for posting about the things we accomplish here at the end. They're small tasks but we're plugging through quite a few of them every evening. Things are getting very real around the house and while I in no way intend to air out laundry on this blog, I think it's an important process for Paul and I to document all of it. The good, the bad and the ugly. I am turning this blog into a book when things calm down, thanks to Blurb, and I want the stories inside of it to really reflect what we're going through. Mainly because, one day, I'm going to get this bug again, and I need a reminder of what it took to get to this point. So I feel the need to really document what we feel and what we think.
Right now, what we think is, this was a really good idea but we were really stupid for doing it. We're exhausted. We're tense. We're snippy with each other. We just want to finish. One year from now, maybe even six months from now, we'll be happy we did this. I mean, in all honesty, we're happy we did it now. But I think we'll really feel that it was the right choice for our family a little later.
This past week we made quite a bit of progress. The tough part about the end of a job is just finishing. Most final tasks are not quick wins. They are long lead time items, like painting trim.
Paul has been installing trim like a mad man. It's everywhere and it makes such a huge difference. He reinstalled doors, framed and installed the door to the closet in the master bedroom and it looks really good. He's pretty proud of it. I'm pretty proud of him. The entire 2nd floor is done, sans some closets we will use leftover pieces to complete. The living room, the largest room on the first floor, is done and all other long pieces have been cut and dry fitted into place in the other rooms. The tough part is getting it painted. I need to ramp up my speed and patch and paint behind him. I'm still only on the first two rooms upstairs.
Our to-do list is still long but that's because the same task is written for every room. I hope to finish the second floor trim painting tonight, it's a tall order, but necessary. The first floor won't be a peach because I still have a lot of paint cut in to do for the walls and I will need to be able to focus. Some minor tile and grout work in the kitchen, some cabinet trimming, some cleaning and we'll be calling this bad boy done as far as our lender is concerned*.
A common, very common in fact, statement that is thrown out in my Monday morning Architecture meetings is, "all we lack is finishing up".
Well, all we lack is finishing up.
*A side bar conversation on this topic is coming.
Saturday, April 20, 2013
The Evolution of a Shower
We have been working on our shower forever now. Normally, a project like this wouldn't have taken us this long, but some situations arose (Watergate for one, Roto Rooter a second and other commitments bringing up the rear) that slowed down our progress by a lot.
The existing shower I am not entirely sure we even have a photo of. It was a tiny, cramped room (think scary movie kind of tight) and had a tarp covering up the back wall. I was terrified to pull it down but apparently nothing was behind it. I don't know if they were concerned about mold and the tarp was preventative or what the deal was. But it was weird and gross. So when we gutted this bathroom down the the floor joists and the studs this tiny little shower enclosure was done too.

The arched area is where my tub sits now. The room to the right is the shower. Please notice that the wall separating the two doesn't even go to the floor. Yea, good times. The original shower also had the ceiling just slightly above where the door opening stops. When we tore everything out we realized there was at least another two feet of space before the attic joists started and decided to open up the space by raising the ceiling. It feels much larger than you would think it would.

Once the drywallers were done with their job, we installed the Schluter Kerdi Shower System. It comes with a pre-sloped floor, a curb, a drain kit and water proofing membrane. You can cut down the sloped floor to whatever size you need and then you combine all the elements to create a totally waterproof system. The orange felt sheets below is that water proof membrane. There are special seals for around the water supply line, the water mixing valve and for inside and outside corners.


This is apparently Paul's favorite tiling shirt. It seems to keep making an appearance.

It's incredible how different it feels now vs. before. We had our electrician include a humidity resistant can light in the shower which is tied into our exhaust fan. Which we have mixed emotions about. It means that if you're in the shower the fan is on (and lets be honest, I'm awful at turning it on) so that's a plus but if we ever want to turn the fan on by itself, the shower light has to be on too. Either way, it doesn't feel like a tiny chamber anymore. It's tall and bright and usable. And we love it.
Tuesday, April 16, 2013
Plowing through the Checklist
While we are trying to bust out this last amount of work, my posts are probably going to become less focused and more random in nature. There is your heads up, proceed with caution.
Last night we went to a community meeting regarding the neighborhood directly next to ours. We live very close to Lincoln Boulevard and the neighborhood on the other side of Lincoln is about to receive $1 million dollars in improvements in set aside grant funds if they meet some qualifying criteria by the time May gets here. I'm not entirely sure you heard me right. ONE MILLION DOLLARS. And were talking about 4 streets here. It's a tiny neighborhood. I want them to get every cent of that money. Lincoln Terrace has already become a much more stable neighborhood and while there is still plenty of room for improvement (cough neighbor cough) the individuals and families moving into our neighborhood seem to be making quality improvements to their homes on their own. But across Lincoln, that is not the case. But the City of OKC along with some other neighborhood groups have determined that this little neighborhood could be incredible and they are willing to invest in it with them. I agree with them, wholeheartedly and am hopeful that this tiny little neighborhood/community can pull together to make it happen too. If it happens, starting in July they will start funneling money into this neighborhood, so pack your bags folks, it's time to get moving. They're going to be replacing sidewalks, rehabilitating 10 existing houses, offering reduced loans to homeowners who can afford to take on a rehab loan, planting trees, etc.
After we attended the SNI meeting, we grabbed a quick bite to eat and headed back to the house to get into the work mode. We were moving at a snails pace last night. Maybe we are exhausted. Maybe we are just over it. I can't even pretend to be able to analyze it anymore. But by the time we finally crawled into bed, we had actually accomplished a couple of tasks which surprised both of us.
 I spent the majority of my evening on the french doors. It took me hours to scrap the other 10 windows front and back on just that one door. As I mentioned before, these things are in bad shape. But I love them. I love falling asleep looking at them and I love waking up looking at them. I love knowing that there is a private room on the other side of those doors that belongs to only Paul and I. It feels grown-up. It feels luxurious. It feels old school. So I scraped two windows at a time. I used Goof Off and a window razor and once the front of the two windows was complete, I moved to the other side and did the same thing on the back for the same two windows. Then I used Windex and cleaned those two windows from the back, would go to the other side and would clean the two windows from the front. Needless to say, by the time I was taping the last bottom window with perfectly straight tape edges I had had enough of the door. The rest of the trim in the house I plan to paint carefully and then take the paint on the glass (accidental of course) off with the razor after I'm done. But since I have spent the time to get these in good shape, I wanted to save myself the chore of cleaning these twice. Door number two is getting the treatment tonight and then it's on to bigger and more accomplished tasks. Like actually painting the trim. Also, this is the most prep I have ever done to any item before painting it in my entire life. No wonder perfectionist people hate painting. It's a pretty awful task when you put forth this much effort. But they are going to be gorgeous. Hopefully I like them a thousand times more once they've been painted to make it all worth it.


Paul, once the grout was done, started trimming out Addison's bathroom. The trim in this room was either damaged badly or rotting so the entire room had no existing trim in it until last night. Where we have existing trim, we are trying, where it makes the most sense visibly and financially, to match the existing trim. But in rooms where all the trim is missing entirely, we were willing to use new trim and this is one of those rooms. We've set up the miter saw and the nail gun in the upstairs hall to make it easier to finish out all the trim upstairs. Paul will finish putting up the other door casing (leading into Addison's room) and will install all the base trim in this bathroom tonight so after I'm done cleaning my door, I can prep it for paint (filling nail holes).
Tonight's work order is pretty daunting (I only mentioned a few of the tasks). We'll see how far we get.
Last night we went to a community meeting regarding the neighborhood directly next to ours. We live very close to Lincoln Boulevard and the neighborhood on the other side of Lincoln is about to receive $1 million dollars in improvements in set aside grant funds if they meet some qualifying criteria by the time May gets here. I'm not entirely sure you heard me right. ONE MILLION DOLLARS. And were talking about 4 streets here. It's a tiny neighborhood. I want them to get every cent of that money. Lincoln Terrace has already become a much more stable neighborhood and while there is still plenty of room for improvement (cough neighbor cough) the individuals and families moving into our neighborhood seem to be making quality improvements to their homes on their own. But across Lincoln, that is not the case. But the City of OKC along with some other neighborhood groups have determined that this little neighborhood could be incredible and they are willing to invest in it with them. I agree with them, wholeheartedly and am hopeful that this tiny little neighborhood/community can pull together to make it happen too. If it happens, starting in July they will start funneling money into this neighborhood, so pack your bags folks, it's time to get moving. They're going to be replacing sidewalks, rehabilitating 10 existing houses, offering reduced loans to homeowners who can afford to take on a rehab loan, planting trees, etc.
After we attended the SNI meeting, we grabbed a quick bite to eat and headed back to the house to get into the work mode. We were moving at a snails pace last night. Maybe we are exhausted. Maybe we are just over it. I can't even pretend to be able to analyze it anymore. But by the time we finally crawled into bed, we had actually accomplished a couple of tasks which surprised both of us.

Paul grouted our master bathroom floor. Now it's ready to be trimmed out and cleaned which will make this room about 97% complete until it comes to the whole "making it a home" part.


Paul, once the grout was done, started trimming out Addison's bathroom. The trim in this room was either damaged badly or rotting so the entire room had no existing trim in it until last night. Where we have existing trim, we are trying, where it makes the most sense visibly and financially, to match the existing trim. But in rooms where all the trim is missing entirely, we were willing to use new trim and this is one of those rooms. We've set up the miter saw and the nail gun in the upstairs hall to make it easier to finish out all the trim upstairs. Paul will finish putting up the other door casing (leading into Addison's room) and will install all the base trim in this bathroom tonight so after I'm done cleaning my door, I can prep it for paint (filling nail holes).
Tonight's work order is pretty daunting (I only mentioned a few of the tasks). We'll see how far we get.
Monday, April 15, 2013
A Well-Rounded Weekend
We had a very well-rounded weekend. We shouldn't be to that phase yet. We should be cramming. But we needed a balanced weekend, so we took one. This week however is going to prove to be quite the mountain of work.
Friday night we had dinner in Edmond and I went to my student's senior presentations while Paul and Addison had ice cream and went to the park.
Saturday we repaired the damaged trim in Addison's room. When the demolition was happening (and even before we bought the house) some of the casings and trim pieces were damaged. Addison's room had two spots that needed to be replaced. Paul took a wood chisel, rubber mallet and a hand saw to them, removed the damaged pieces, cut existing trim not being used down to size and installed it so (once it's painted) will look complete. We also made a trip to Lowe's where Addison was the most beloved item in the entire store, by everyone. During her nap, Paul took box after box and bag after bag and tree limb after tree limb out to the curb and created the most organized bulky waste day pile you have ever seen. We cleaned some of the rooms and then we had dinner with some of our favorite people.

Sunday, Paul grouted the backsplash tile wall directly behind the sink/cabinets in the kitchen before Addison and I even got up. We went to church, removed a back screen door and grouted the shower. And I started to clean the glazing in the french doors in our bedroom.

By "started to", I mean that I got two panes clean out of twenty-four. Between the unbelievably sloppy paint job (like a blind person did it), the layer of nicotine and drywall dust, it took awhile. I mean, the two I cleaned look like there's no glass in them at all. Tonight I plan to tackle "trim" in it's entirety, not accomplishing the entirety but just all things trim, I will probably touch tonight. Taping, caulking, painting, etc. Unfortunately, cleaning and scraping the other windows in this door are included in that. Yipee.
We are considering this one of our final pushes. I am hopeful that we can find the energy and the determination to do whatever it takes this week to make the rest of this happen. This includes all the very detailed finish work (painting trim, cutting in remaining paint areas, touching up ceilings, adding shoe mold to our cabinets, etc.) We will have access to a free (to us) trailer on Saturday for a few hours after my piano gets dropped off. We will use it to empty our very organized and full storage locker. Before I "move" into this house, it really needs to be done. So there's the motivation right?! Work (like our real work a.k.a. our day jobs) are going to be long this week as well as we both push for project deadlines and tasks. If we are walking zombies by Tuesday afternoon, please disregard us. Also, please send prayers, love and caffeine (mainly in the form of coca-cola - but we won't be picky).
Saturday, April 13, 2013
Floor Registers
I am a spray paint queen.
You don't like the way that $10 lamp looks? Spray paint it.
Your railing is peeling and cracked? Scrub it down and spray paint it.
You name it, I've probably spray painted it at least once. I typically try not to throw things out or buy replacements until I've tried to spray what I've already got. Old sinks, picture frames, furniture, knickknacks, the list could go on forever.
I'm quite good at spray painting too. Not too runny, not too light. I learned it from my youth minister, who used to work with theatre props and was a master at creating sets and props. And being good at spraying painting in Oklahoma wind is saying something.
Our dear sweet HVAC installer provided tan-ish brown floor register covers for our house. I know he thought he was doing good since they were the closest thing to our wood floor color. But they ugly. They so ugly even my half blind great aunt would think they were ugly.
I actually don't think I have a half blind great aunt, but if I did, she would think they weren't all that good looking.
I knew the ones that ended up on the tile would need to be painted and figured I'd end up painting the ones on the wood floors at some point too. But the tile floor situation was much more critical than the wood floor situation.

Ignore the drywall mud all over it, just look at the brown. Ick, right?
Just like the grout, I want these puppies, in the tile floors, to just go away. One day while at Lowe's we swung by the spray paint department and picked up a can of gray spray paint. Without a tile sample to compare it to. And here's the thing, I'm great with color, when and only when it is in front of me. I am absolutely, positively horrible at color selection and blending when I'm trying to do it by memory.
But the cap looked close enough to the tile so I popped these guys up out of the tile floors, scraped all the drywall mud off, sprayed them down with a cleaning solution and took them to the backyard for a quick update.


They were looking pretty good. I got three of them done while helping Paul on some other tasks and Addison was down for a nap. But once I got them inside and back into their cozy homes I gasped at how ridiculously far off in color they were.

They appeared to be very blue instead of gray and looked almost as bad as the tan ones. I rolled my eyes out of frustration that I was going to have to buy another can of spray paint. I can't believe I wasted a perfectly good can of spray paint (cha-ching) that I'm just now going to have to paint right over.
Paul mentioned they were still a little tacky for his liking when he dropped the other two into place and when I looked up at him, there right next to him on the counter was a can of spray paint P-R-I-M-E-R. We didn't even buy spray paint. We bought primer. And not once did I read the can, and not once did I check the color and not once in spray painting or talking did I even see the huge six letter word at the top of the can as bold as it could be.
At least now when I paint over them, I'll be painting over primer and not paint. I don't feel so bad about the wasted $5 now. I mean, not wasted, totally on purpose, primed floor register covers.
Next time we swing by the home improvement store, which you know, we do practically every day, we plan to take a small tile sample with us. Now I'll just be putting my handy dandy spray paint skills to use twice on these guys. Unfortunately, and as we all know so well, this is the perfect example of, "ain't nobody got time for that".
Guys, I haven't been able to get that song out of my head since the first time I saw the autotune remix. You're welcome.
Thursday, April 11, 2013
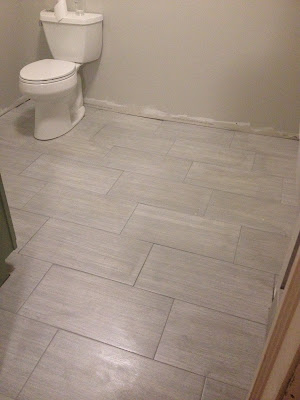
Grouting - The Nitty-Gritty Details
When I specify tile and grout at work, I prefer to have the grout blend into the tile. I do not like accentuating tile using contrasting grout, especially on the floor. I think it looks cheap and like a fast food restaurant floor. Since I started professionally practicing in 2008 I have matched, as closely as possible, my grout selections to my main tile. I think it looks clean and seamless. The only time I am a proponent for contrasting grout is when it is dark gray/black grout with white subway tile. And even then I'm halfway on the fence about it some days.
So that's what we did at the house. We purchased this floor tile because of it's color, pattern, size and price. I bought it through one of my product representatives as it is not available for purchase from big box retailers or small tile shops. We installed it using appropriate mortar and 1/8" spacers.


So that's what we did at the house. We purchased this floor tile because of it's color, pattern, size and price. I bought it through one of my product representatives as it is not available for purchase from big box retailers or small tile shops. We installed it using appropriate mortar and 1/8" spacers.
Then I selected the grout color. In case you've never selected grout before there are two types: sanded and unsanded. You use unsanded grout in areas where you have a delicate tile (glass, etc) and sanded in most other installations. I'm not a big fan of installing the sanded grout, because it's grainy and rough during install but does really well once it's cured. Also, there are too many grout manufacturers and each of them has their own color chart of grout. It's kind of ridiculous.

Once we settled on a manufacturer and the color Delorian Gray, we started laying it on throughout the house and I couldn't have been more thrilled with how it set up.


I cannot recommend matching enough. However, if it isn't almost exactly a match, don't do it. Just like paints and fabrics can be kind of similar and be completely different, that can happen with grout. You don't want your grout to go tan and your tile to read blue, it needs to be as close as possibly, otherwise it'll look like you missed.
Matches need to match or don't even bother.
With that being said, we did not match our grout color in the kids bathroom on their walls. We used the 1" x 1" glass mosaic tile (that I love) and went with a bright white grout instead.
That was just a personal aesthetic choice as well. We did use a grout additive instead of water when doing this part of the tile job though. When you use regular latex grout whether sanded or not you have to seal it. Otherwise it is prone to stains, water absorption and mildew/mold. But when you use epoxy grout, many of those factors go away and sealing is not required. However, epoxy grout is costly and difficult to work with. So over the last few years, grout manufacturers have come up with an additive that you mix your dry grout powder with (instead of water) that allows a standard latex grout to act similar to an epoxy.
My wonderful tile rep at Crossville had been given some bottles of this additive to distribute for trial and she passed two of them along to us to use on our project. As I mentioned before our friend Tara grouted this shower and while the installation of the grout was more difficult to install than a typical grout, once she got the hang of it it went quickly. The grout did dry out extremely fast and we were constantly having to add an ounce or two of the additive, remixing it to get it back into a usable form.
We've only been using the shower for a month now so I can't report on how its handling stains and mildew yet but it seems to be holding up better than the grout in the shower at our apartment was.
So, the moral of today's story kids is to match your grout, it will look fabulous. And use epoxy if you can, if you can't, request an additive. It should save you some cleaning elbow grease later.
Wednesday, April 10, 2013
Not All Paints are Created Equal
The big gaping hole in our living room ceiling was covered over Easter Weekend, while we were in Texas. It is so nice to have contractors you trust, to be able to get out of the house/town for two nights and come home to a completed job.

Paul hauled the tub of primer up from the basement and put on the first coat while I worked in the kitchen trying to organize, clean and empty the dishwasher. He realized he was too low on ceiling paint and shot off to Home Depot to pick up some more. But shortly after he left, and I was making the most addictive granola in the entire world, I realized I didn't have any vanilla extract. I shot him a text asking him to swing by the store while he was out.
Instead of making two trips, he looked up Glidden and found out that they sold it at Wal-Mart as well. We like the ceiling paint that goes on pink and dries white. It saves us a lot of re-work while the paint is drying. We used it at our last house, we used it on every ceiling in this house. He grabbed what he needed from Wal-Mart and then came home and started applying the ceiling paint.
The can was slightly different than the first, but they were both Glidden, both white ceiling paint with the pink additive. Surely they were the same thing, right?!
We woke up the next morning and determined pretty quickly they were not the same paint. It's amazing that Glidden goes to the effort to make two different ceiling paints (white with the pink additive). I have to think that is extremely wasteful financially and wasteful of resources. But hey, they didn't ask me and it's not my company.
We should have known better. Not all paints are created equal. Even when you buy the exact same paint from the same store and the same row, there is a good chance that those paints came from different lots and their slightly off. We shouldn't have been so quick to just buy whatever white Glidden ceiling paint they had at Wal-Mart assuming that Glidden couldn't possibly make two types of the exact same thing and sell it to two different stores.
The new ceiling paint was noticeably more tan even though it claimed to be white. So back to Home Depot we went and bought the white we really liked. Slapped up another layer of paint and now it's as if our flood never even happened. Except for the ceiling fan hasn't arrived or been installed yet. We discussed just repainting the entire ceiling in the living room with the new paint. Chances are, no one would have noticied. But when they were next to eachother we both preferred the stark white over the "cream".
Paul took that can of "white" paint down to the basement and even though it is formulated for ceilings threw it up on the basement panelling as a sort of primer.


The tiki bar days have ended. While it still needs primer on about 1/3 of the walls and a final paint job, it's already a pretty amazing transformation. At least the paint served a good purpose somewhere.
Tuesday, April 9, 2013
Kitchen Backsplash
I'm not ashamed to say it:
I'm on the subway tile train. I get it. I've gotten it for a long time. It's beautiful and clean. It's throwback and yet modern. It's versatile. I get it, I get it, I get it. I just wish everyone else and their dog didn't get it too.
When we renovated our last kitchen we installed subway tile on the backsplash in your standard brick format.


 Some days we feel so far from completion. And then we have an incredibly productive evening and we're amazed at how far we've come and how close we are to the end.
You guys! We're getting close!
I'm on the subway tile train. I get it. I've gotten it for a long time. It's beautiful and clean. It's throwback and yet modern. It's versatile. I get it, I get it, I get it. I just wish everyone else and their dog didn't get it too.
When we renovated our last kitchen we installed subway tile on the backsplash in your standard brick format.


I enjoyed the backsplash over the two years we had it. It was easy to clean and it gave a blank slate backdrop to our food, our utensils and the artwork in the room. I was pretty well sold to install it again in this house so I ordered up a few more boxes of tile and then we waited until we were ready to start the process.
But days before we were ready to begin install, I started debating the installation method. I had at least five different choices for installation after narrowing it down. Half offset brick, vertical brick (also half offset), stacked bond (straight) and vertical herringbone and 45° herringbone.

We had already decided to tile the entire back wall of the kitchen. I'd even considered for a moment, tiling all of the walls in the kitchen from floor to ceiling. But after some internal, crazy, interior design debate I decided to keep some of the walls painted and only to tile the back wall. Now here's where my dilemma for the installation method came in. The flooring and the waterfall edge of the counter (and the counter material/color) put this kitchen right on the fringe of modern/traditional. The green cabinets also play a huge factor on which side of the line the kitchen falls. I am trying to be real careful to not let the "modernity" of these elements take over. I still want this kitchen to have some traditional flare and the backsplash can really make or break that overall goal.
So here was how it started shaking down:
Standard Half Offset Brick
Pros:
Classic Appearance (relatively historic, good balance between the modern and the traditional)
Easy Installation
Follows the running bond install we did on our floors
Cons:
90% of people who have subway tile install it in this method
Compared to the other choices, it could be considered "boring"
Vertical Half Offset Brick
Pros:
Different (not seen very often, unless you watch House)
Easy Installation
Cons:
80% modern, 20% traditional
Could be too stimulating visually since all the other strong lines run horizontally in this room.
45° Herringbone
Pros:
I love it
Much more feminine in appearance leading me to see it as more traditional
Visually agreeable (movement but not overwhelmingly so)
Chevron style (which Paul has loved long before the trend hit - it's his love for emergency management)
Cons:
More complicated installation (more time, more cuts, more waste, etc.)
Trendy (am I going to look at it 5 years from now and regret it?)
Doesn't follow suit with anything in the house
Vertical Herringbone
Pros:
Still herringbone pattern
Less complicated to install than 45° option
Cons:
70% modern, 30% traditional
Trendy (again with the 5 year plan?)
Doesn't follow suit with anything in the house
Stacked Bond
Pros:
Easy installation
Straight Lines
Cons:
50% modern, 50% traditional
Probably my least favorite out of the gate
I surprisingly didn't lose sleep over this decision. Maybe I'm just too tired to lose anymore sleep to things like this. I texted my parents last night with all the options and we played a game of "Help the tired interior designer!". They were absolutely no help, which I have already told them. They had just as many opinions as I did but we couldn't come to a consensus. So I quickly decided to just go with my gut decision. I had the vertical herringbone, the vertical brick and the stacked (straight) install all knocked out pretty quick. They just didn't feel right for what I was trying to accomplish in the room. It was down to the herringbone rotated 45° or the classic brick.
While I would have liked the herringbone, and there may be days I kick myself for not doing it, I don't think I'll ever regret installing the standard brick pattern. So that's what we chose at 9:30 last night. And if we're totally honest with ourselves, the ease of install may have had something to do with it. We wouldn't have made it as far last night as we did if we had been cutting 45° angles. We may also not have been talking to eachother this morning.


We did the install just like we did at the last house. Paul would throw some mortar up on the wall, I'd start tiling. He'd run up and down the basement stairs cutting, quite exact pieces to fit at the end of the walls, under the cabinets, around the switch and outlets and around the top of the window frame.


We're halfway done. We have to tile just a few more pieces above this center window, tile over the windows to the right, down the wall to the window bench and over the back door.
We also made some more progress on our vent hood. Sunday afternoon Paul put all the structure in the ceiling, we made all the necessary prep to get it up but the two of us couldn't hold it into place and screw it in without some help. So our friend Phil came by to help hold it into place while we all three took turns screwing the 16 tiny screws into place. It's powered and hopefully sometime today will be hooked up to the venting and vented straight out the back of the house, right over that window.
You guys! We're getting close!
Kitchen Window Casing
The window and door casings in our house are 1" deep, extremely wide and extremely custom. Not only are they mitered joints, they are a combination of 45° and 90° mitered cuts and joints. During the process of de-construction and construction, some frames got removed that wouldn't be reused, some were damaged.


This little window and it's casing in our kitchen received major damage during the demolition phase and so we popped off the remainder with plans to reattach casing at the end of the project. But as we were looking at the room and the available trim options to us, we decided to dig out an old door frame from the basement and modify it to fit here instead. That way, all the window casings in this very prominent room would match. The kids bath needs all new casings for doors and windows. Therefore, we'll use something different in that room, but since all the trim in that one room will match, most people won't even notice that we have two types of casings in the house. Except all of you since I just blogged about it.
The existing casing we picked up in the basement had a 32.5" opening and this window casing needed to have a 32" opening. We cut the frame down to size (in height) using our miter saw and then cut the frame in half right down the center, removed 1/2" and then broke out our nail gun and pieced it back together.


It needs some caulk at the joints, the nail holes filled and a good coat of paint but I can't believe how different the entire room feels now that this one, itsy bitsy window has been trimmed out.
Monday, April 8, 2013
A Quickie
We've been busy. Busy at work. Busy at the house. Busy with school prep. Busy with a toddler. We've been busy. Tired of hearing me complain about how busy we are? Well give me 3-4 more weeks and then I promise I'll lay off a bit. School will be out for the summer, the house WILL be done (as far as our lender is concerned) and we can start working on other projects on our own timeline.
As I mentioned before, we had our plumbing problem fixed.
But since then:
Today, the electrician is at the house working on his remaining to do items (install sconces, new service line, can lights on the covered porch, etc.).
Our major tasks can really be summed up in four areas:
I promise to try and keep you updated a little better over the next few weeks.
As I mentioned before, we had our plumbing problem fixed.
But since then:
- We went to Texas for Easter weekend.
- We had the ceiling repaired.
- We primed and painted the patched ceiling (more on this later).
- We tiled and grouted the front entry.
- We ordered another ceiling fan to replace the one damaged in the flood.
- We tiled the bonus room.
- We installed the support system in the ceiling for our new island vent hood.
- We repaired a broken step.
- We attached the boards to the top of the window bench and created the beginnings of a provision for the gap at the wall.
- We painted the double oven cabinet where we had to add some unfinished wood supports to hold our oven in place.
- We primed the metal floor air registers that sit on tile (more about this later).
- I took the 3rd section of the NCIDQ (again).
- Paul took Addison to the zoo while I was at my test.

Today, the electrician is at the house working on his remaining to do items (install sconces, new service line, can lights on the covered porch, etc.).
Our major tasks can really be summed up in four areas:
- Finish Tile/Grout
- Finish installing Trim
- Finish Painting (walls and trim)
- Clean
I promise to try and keep you updated a little better over the next few weeks.
Subscribe to:
Posts (Atom)